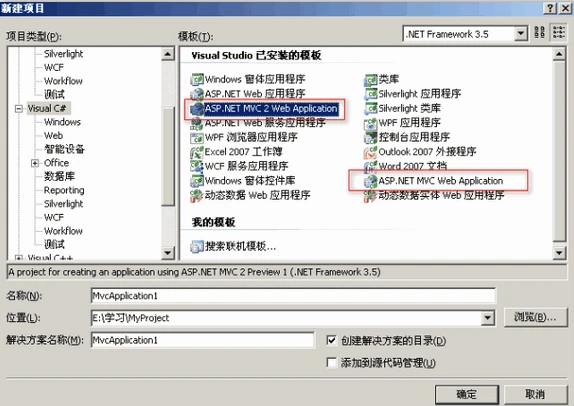
Asp.net MVC1.0正式版刚刚出来才几个月,ASP.NET MVC ASP.NET MVC2 Preview 1 Released 就跟我们见面了 ,您可以点击这儿下载。该版本可以和以前的Asp.net MVC1.0 兼容,安装了ASP.NET MVC2后,打开vs2008 ,新建项目,可以看到同时存在1.0和2的模板,如下图:
在ASP.NET MVC2版中,包含了区域(Area)、数据标记验证(Data Annotation Validation)、强类型UI辅助方法和模板化辅助方法(TemplatedHelper)四个特性,下面就分别来看下这个四个特性。
区域(Areas)
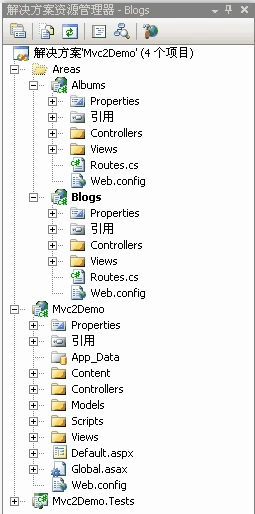
区域(Areas)可以将Asp.net MVC应用的功能进行分割和组合,它可以将Controller和View进行分组管理。如下图中就是将博客(blogs)和相册(Albums)的部分通过Areas提出来单独管理。遗憾的是在预览版1中还没有任何工具的支持,所以Areas项目必须通过手动添加和配置。
数据标记验证(Data Annotation Validation)
DataAnnotation提供了一个简单的方式,在应用中的Model(模型)和ViewModel(视图模型)类中添加验证规则,在ASP.NET MVC中有自动的绑定和UI辅助方法验证支持。首先创建一个实体类Users,代码如下:
namespace Mvc2Demo.Models
{
    public class Users
    {
        [Required(ErrorMessage = "用户名不能为空!")]
        public String UserName { get; set; }

        [Range(0, 150, ErrorMessage = "年龄必须在0-150之间!")]
        [Required(ErrorMessage = "年龄不能为空!")]
        public Int32 Age { get; set; }

        [Required(ErrorMessage = "邮箱地址不能为空!")]
        [RegularExpression("\\w+([-+.']\\w+)*@\\w+([-.]\\w+)*\\.\\w+([-.]\\w+)*",
            ErrorMessage = "邮箱格式不正确,请重新填写!")]
        public String Email { get; set; }
    }
}
使用Required 、RegularExpression 等属性需要引用命名空间
using System.ComponentModel.DataAnnotations;
在Controllers目录下创建UserController.cs,代码如下:
namespace Mvc2Demo.Controllers
{
    public class UserController : Controller
    {
        public ActionResult Index()
        {
            return View();
        }
        public ActionResult Create()
        {
            Users user = new Users();
            return View(user);
        }
        //在ASP.NET MVC2预览一版中使用[HttpPost]
        //1.0版中使用[AcceptVerbs(HttpVerbs.Post)]
        [HttpPost]
        public ActionResult Create(Users user)
        {
            if (!ModelState.IsValid)
            {
                return View(user);
            }
            return View("Success");
        }
    }
}
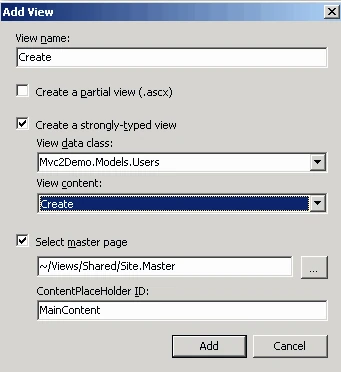
在上面的任意一个Create方法上右击,选择Add View … ,在弹出的对话框中做相应的设置,然后点击Add,就会在View下添加相应的目录和页面文件,如下图:
添加完后,系统会自动为Create视图生成如下代码:
 <%@ Page Title="" Language="C#" MasterPageFile="~/Views/Shared/Site.Master"
 Inherits="System.Web.Mvc.ViewPage<Mvc2Demo.Models.Users>" %>
 <asp:Content ID="Content1" ContentPlaceHolderID="TitleContent" runat="server">
      Create
  </asp:Content>

  <asp:Content ID="Content2" ContentPlaceHolderID="MainContent" runat="server">
      <h2>Create </h2>
     <%= Html.ValidationSummary("Create was unsuccessful.
         Please correct the errors and try again.") %>
     <% using (Html.BeginForm()) {%>
         <fieldset>
             <legend>Fields</legend>
             <p>
                 <label for="UserName">UserName:</label>
                 <%= Html.TextBox("UserName") %>
                 <%= Html.ValidationMessage("UserName", "*") %>
             </p>
             <p>
                 <label for="Age">Age:</label>
                 <%= Html.TextBox("Age") %>
                 <%= Html.ValidationMessage("Age", "*") %>
             </p>
             <p>
                 <label for="Email">Email:</label>
                 <%= Html.TextBox("Email") %>
                 <%= Html.ValidationMessage("Email", "*") %>
             </p>
             <p>
                 <input type="submit" value="Create" />
             </p>
         </fieldset>

     <% } %>
     <div>
         <%=Html.ActionLink("Back to List", "Index") %>
     </div>
 </asp:Content>
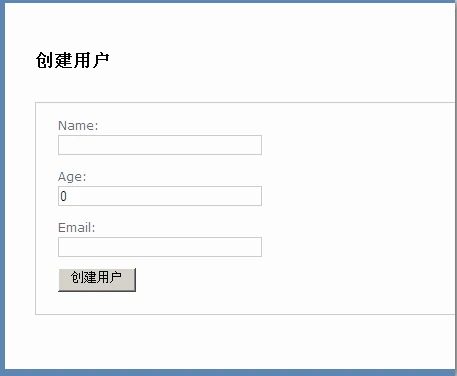
运行后的界面如下图:
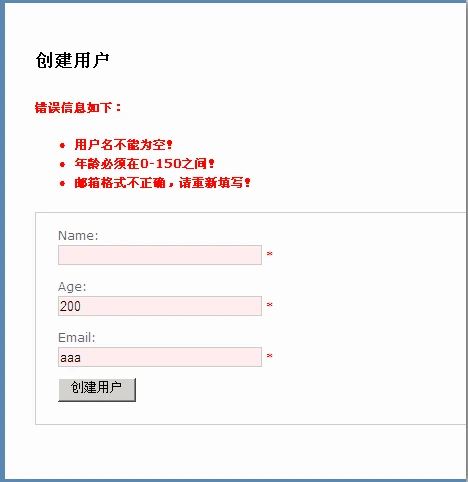
在文本框中填入一些非法数据后,点击“创建用户”后 非法数据不能通过验证,将在页面中显示错误提示信息,如下图:
强类型UI辅助方法
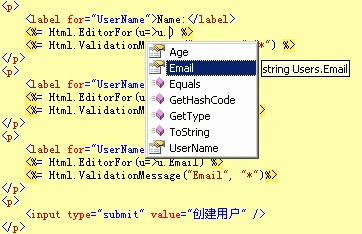
在ASP.NET MVC2预览1版中提供了新的Html辅助方法,这些辅助方法允许你在引用视图模板的模型对象时使用强类型的lambda表达式,如<%=Html.EditorFor(u=>u.UserName) %> ,而且lambda表达式也提供了良好的智能提示功能,如下图:
在ASP.NET MVC2的预览版1中提供了Html.EditorFor、Html.LabelFor(),和 Html.DisplayFor() 辅助方法的内置支持。在以后的版本中将会提供更多这种辅助方法的支持。下面的代码是使用了辅助方法的“Create”视图模版。
<%@ Page Title="" Language="C#" MasterPageFile="~/Views/Shared/Site.Master"
Inherits="System.Web.Mvc.ViewPage<Mvc2Demo.Models.Users>" %>
 <asp:Content ID="Content1" ContentPlaceHolderID="TitleContent" runat="server">
     Create
 </asp:Content>
 <asp:Content ID="Content2" ContentPlaceHolderID="MainContent" runat="server">
     <h2>Create </h2>
     <%= Html.ValidationSummary("Create was unsuccessful.
     Please correct the errors and try again.") %>
     <% using (Html.BeginForm()) {%>
         <fieldset>
             <legend>Fields</legend>
             <p>
                 <%= Html.LabelFor(u=>u.UserName) %>
                 <%= Html.EditorFor(u=>u.UserName) %>
                 <%= Html.ValidationMessage("UserName", "*") %>
             </p>
             <p>
                 <%= Html.LabelFor(u=>u.Age) %>
                 <%= Html.EditorFor(u=>u.Age) %>
                 <%= Html.ValidationMessage("Age", "*") %>
             </p>
             <p>
                 <%= Html.LabelFor(u=>u.Email) %>
                 <%= Html.EditorFor(u=>u.Email) %>
                 <%= Html.ValidationMessage("Email", "*") %>
             </p>
             <p>
                 <input type="submit" value="Create" />
             </p>
         </fieldset>
     <% } %>
    <div>
         <%=Html.ActionLink("Back to List", "Index") %>
     </div>
 </asp:Content>
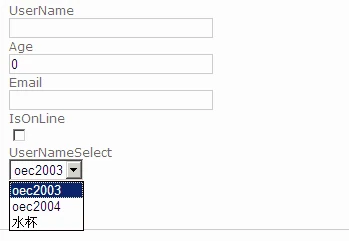
Html.EditorFor()支持任何的数据类型,而且会根据数据类型做出判断来生成不同的html代码,现在在实体类Users中添加一个bool类型的属性IsOnLine,如下图:

在“Create”视图模板中添加相应代码,运行后会看到Html.EditorFor()会将string类型的显示为文本框,bool类型的显示为复选框。除了对这些简单类型的支持外,Html.EditorFor()还可以将传递给他的拥有多个公有属性的复杂对象的属性自动进行循环,根据数据类型生成相应的html代码,并且能识别属性上定义的验证信息,下面的代码就是重写后的“Create”视图模板。
<h2>Create </h2>
    <%= Html.ValidationSummary("Create was unsuccessful.
    Please correct the errors and try again.") %>
      <% using (Html.BeginForm()) {%>
          <fieldset>
            <legend>Fields</legend>
            <%= Html.EditorFor(u=>u) %>
              <p>
                <input type="submit" value="Create" />
            </p>
       </fieldset>

   <% } %>
UI 辅助方法模板化
UI辅助方法模板机制可以自定义模板文件来控制显示的输出,具体操作看下面的例子 。
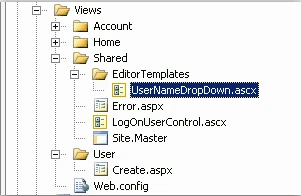
1 在\Views\Shared目录下添加EditorTemplates子目录,然后在该目录下添加名为“UserNameDropDown.ascx”的模板文件。
2在UserNameDropDown.aspx文件中添加如下代码。
<%@ Control Language="C#" Inherits="System.Web.Mvc.ViewUserControl<String>" %>
 <%= Html.DropDownList("",new SelectList(new[]{"oec2003","oec2004","水杯"})) %>
3 在实体类User中添加UserNameSelect属性,在属性上面用UIHint特性来指定UserNameDropDown模板 如下:

4 如果Create视图模板中是用的<%= Html.EditorFor(u=>u) %> 的写法,就不用做任何更改,否则可以使用<%=Html.EditorFor(u=>u.UserNameSelect,”UserNameDropDown” %> 将刚才定义的模板显示输出,运行后显示结果如下:
参考:http://weblogs.asp.net/scottgu/archive/2009/07/31/asp-net-mvc-v2-preview-1-released.aspx
评论
评论组件按需加载,不影响文章阅读速度。