NHibernate相信大家都已非常熟悉,园子里有很多高手写了相关的系列文章,不过我还是NHibernate的一名初学者,在此将一个晚上学习成果分享一下,一个很简单的利用NHibernate实现增删改的例子。
本例中使用的NHibernate版本为版本为官方2008年9月29日最新发布的NHibernate-2.0.1.GA版本,点击下载
1 首先创建一个数据库NHibernateSample,使用的数据库版本为sqlserver2005。在该数据库中创建表UserInfo。
CREATE TABLE [dbo].[UserInfo]
(
    [UserInfoID] [int] IDENTITY(1,1) NOT NULL,
    [UserName] [varchar](20) COLLATE Chinese_PRC_CI_AS NULL,
    [Email] [varchar](100) COLLATE Chinese_PRC_CI_AS NULL
)
2 打开vs2008,创建web application 命名为Web,解决方案的名称设为NHibernateDemo,然后在此解决方案下添加两个类库项目BLL和Model。
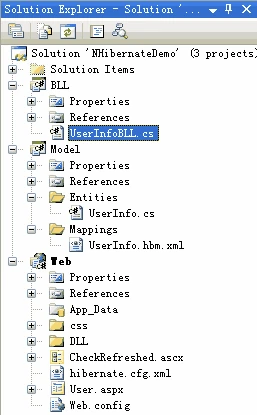
3 解压下载的NHibernate包,将NHibernate-2.0.1.GA-bin\bin\net-2.0目录下的dll文件复制到web项目中的DLL文件夹中。DLL文件夹用来存放一些公用的dll文件。
4 在Model项目中创建两个目录:Entities和Mappings。分别存放实体类和映射文件。
在Entities目录下创建类UserInfo.cs
public class UserInfo
{
    public virtual int UserInfoID { get; set; }
    public virtual string UserName { get; set; }
    public virtual string Email { get; set; }
}
需要注意到是实体类中的属性必须加virtual修饰符。
在Mappings目录下创建映射文件UserInfo.hbm.xml
<?xml version="1.0" encoding="utf-8" ?>
<hibernate-mapping   xmlns="urn:nhibernate-mapping-2.2"
   assembly="Model" namespace="Model">
  <class name ="Model.Entities.UserInfo,Model" table="UserInfo">
    <id name="UserInfoID" column="UserInfoID" type="Int32" unsaved-value="0">
      <generator class ="native"></generator>
    </id>
    <property name="UserName" column ="UserName" type="string" length="20" not-null="false"/>
    <property name="Email" column="Email" type="string"
         length="100" not-null="false" ></property>
  </class>
</hibernate-mapping>
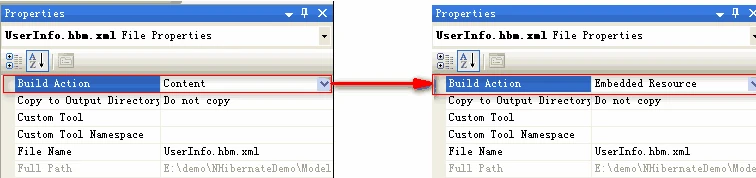
映射文件创建好后,要修改该文件的输入操作为“嵌入式资源”,默认情况下为内容,在映射文件上右击属性,修改如下:
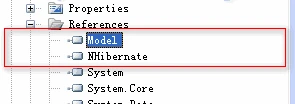
5 在BLL项目中创建类UserInfoBLL.cs 用来实现对UserInfo表的增删改操作。在BLL项目中添加对Model和NHibernate的引用
UserInfoBLL.csl类的代码如下:
public class UserInfoBLL
{
    private string path = HttpContext.Current.Server.MapPath("~/hibernate.cfg.xml");

    public bool Insert(UserInfo userInfo)
    {
        Configuration cfg = new Configuration().Configure(path);

        ISession session = cfg.BuildSessionFactory().OpenSession();
        ITransaction transaction = session.BeginTransaction();

        try
        {
            session.Save(userInfo);
            transaction.Commit();
            return true;
        }
        catch (Exception e)
        {
            transaction.Rollback();
            return false;
        }
        finally
        {
            session.Close();
        }
    }

    public IList<UserInfo> GetUsers()
    {
        Configuration cfg = new Configuration().Configure(path);
        ISession session = cfg.BuildSessionFactory().OpenSession();

        //使用HQL
        IList<UserInfo> list = session.CreateQuery(" from UserInfo")
            .List<UserInfo>();
        return list;
    }

    public bool Update(UserInfo userInfo)
    {
        Configuration cfg = new Configuration().Configure(path);

        ISession session = cfg.BuildSessionFactory().OpenSession();
        ITransaction transaction = session.BeginTransaction();
        try
        {
            session.Update(userInfo);
            transaction.Commit();
            return true;
        }
        catch (Exception e)
        {
            transaction.Rollback();
            return false;
        }
        finally
        {
            session.Close();
        }
    }

    public bool Delete(UserInfo userInfo)
    {
        Configuration cfg = new Configuration().Configure(path);

        ISession session = cfg.BuildSessionFactory().OpenSession();
        ITransaction transaction = session.BeginTransaction();
        try
        {
            session.Delete(userInfo);
            transaction.Commit();
            return true;
        }
        catch (Exception e)
        {
            transaction.Rollback();
            return false;
        }
        finally
        {
            session.Close();
        }
    }

    public UserInfo GetUserInfoById(int userId)
    {
        Configuration cfg = new Configuration().Configure(path);
        ISession session = cfg.BuildSessionFactory().OpenSession();
        return session.Get<UserInfo>(userId);
    }
}
上面的GetUsers方法中用的是HQL查询的数据,NHibernate查询数据的方式有三种,具体参见NHibernate文档。
6 在web项目的根目录下添加hibernate.cfg.xml文件,该文件用于配置一些数据库连接方面的信息。
<?xml version="1.0" encoding="utf-8"?>
<hibernate-configuration  xmlns="urn:nhibernate-configuration-2.2" >
  <session-factory name="NHibernateDemo">
    <property name="connection.driver_class">NHibernate.Driver.SqlClientDriver</property>
    <property name="connection.connection_string">
      Data Source=.\SQLEXPRESS;Initial Catalog=NHibernateSample;
      Integrated Security=True;Pooling=False;uid=sa;pwd=sa123
    </property>
    <property name="adonet.batch_size">10</property>
    <property name="show_sql">false</property>
    <property name="dialect">NHibernate.Dialect.MsSql2005Dialect</property>
    <property name="use_outer_join">true</property>
    <property name="command_timeout">10</property>
    <property name="query.substitutions">true 1, false 0, yes 'Y', no 'N'</property>
    <mapping assembly="Model"/>
  </session-factory>
</hibernate-configuration>
7 在web项目中添加Model和BLL的引用。
接着添加页面User.aspx,前台的现实我们使用repeater控件
<asp:Repeater ID="rptUserInfo" runat="server">
    <HeaderTemplate>
        <table id="tblUserInfo" border="0" width="100%" cellpadding="0" cellspacing="1">
            <tr>
                <td>
                    <input type="checkbox" id="chkAll" name="chkAll" value="checkbox"
                      onclick="checkAll('chkAll',this);" />
                </td>
                <td>
                    用户ID
                </td>
                <td>
                    用户名
                </td>
                <td>
                    电子邮箱
                </td>
            </tr>
    </HeaderTemplate>
    <ItemTemplate>
        <tr>
            <td>
                <input type="checkbox" name="chkSelect"
      value='<%# (Container.DataItem as Model.Entities.UserInfo).UserInfoID %>'
                    onclick="checkAll('chkAll',this);" />
            </td>
            <td>
                <%# (Container.DataItem as Model.Entities.UserInfo).UserInfoID%>
                </td>
            <td>
                <%# (Container.DataItem as Model.Entities.UserInfo).UserName%>
                </td>
            <td>
                <%# (Container.DataItem as Model.Entities.UserInfo).Email%>
                </td>
        </tr>
    </ItemTemplate>
    <FooterTemplate>
        </table>
    </FooterTemplate>
</asp:Repeater>
后台绑定方法
private void BindInfo()
{
     UserInfoBLL u = new UserInfoBLL();
     IList<Model.Entities.UserInfo> list = u.GetUsers();
     rptUserInfo.DataSource = list;
     rptUserInfo.DataBind();
}
新增,修改和删除的代码就不一一贴出了,因为比较简单 就是调用UserInfoBLL类中的方法而已,大家可以在下面下载本实例的源码看。
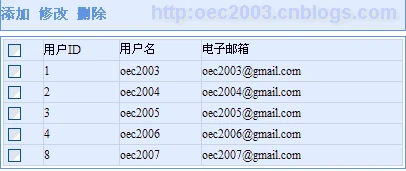
最后的运行结果
需要注意的地方:
- 实体类中的属性要加virtual修饰符。
- 实体类的映射文件UserInfo.hbm.xml 的生成操作默认为为“Content(内容)”,要将之改为“Embedded Resource(嵌入式资源)”
- hibernate.cfg.xml配置文件的connection.connection_string 要修改为自己的连接串。
- 终于写完,由于刚接触NHibernate,不好的地方希望大家批评指正,希望对初学NHibernate的朋友有所帮助。
评论
评论组件按需加载,不影响文章阅读速度。